How to Import Users?
Introduction
Efficiently manage your organization’s directory by importing multiple users at once using a structured user data file. This method is ideal for onboarding new employees or updating existing user records in bulk.
Step-by-Step Instructions:
Prerequisites
Before starting the import, ensure the following:
- Zoho Mail is integrated with Zoho One (if you plan to assign mailboxes during import).
- You have admin privileges to access the Directory and manage users.
- Your import file is correctly formatted (see below).
Supported File Formats
You can import user data using any of the following formats:
- XLS (Microsoft Excel 97–2003)
- XLSX (Microsoft Excel Open XML)
- CSV (Comma Separated Values)
- VCF (vCard format)
Tip: CSV is the most widely used format and ideal for compatibility across systems.
Supported Character Encodings
Ensure your file uses one of the following encodings for accurate data processing:
- UTF-8, UTF-16
- ISO-8859-1, ISO-8859-2, ISO-8859-9 (Turkish)
- GB2312 (Simplified Chinese)
- GBK, Big5 (Traditional Chinese)
- Shift_JIS (Japanese)
- Windows-1251 (Cyrillic)
If you’re unsure, UTF-8 is the safest and most universally supported choice.
Mandatory Fields for Import
Your import file must include the following fields:
- Email Address
Each user must have a unique, valid email address.
If users have multiple email addresses, list them in separate columns and map them individually.
- Password
Required if you’re importing users with credentials.
Passwords must be at least 8 characters and include a letter, number, and special character.
- Custom Fields
If you’ve marked any custom fields as mandatory in the admin panel (e.g., Department, Employee ID), make sure they’re present in the file and mapped correctly during import.
Step-by-Step: How to Import Users
Follow these steps to complete a successful import:
1. Sign in to Zoho One
- Go to Zoho One and log in using your admin account.
- Navigate to the Directory from the left-hand panel.
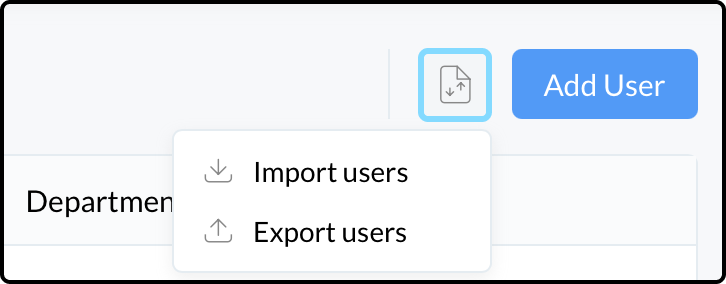
2. Access the Users Section
- In the Directory, click Users.
- Click the More Options icon (three dots or gear icon) in the top-right corner.
- Select Import.
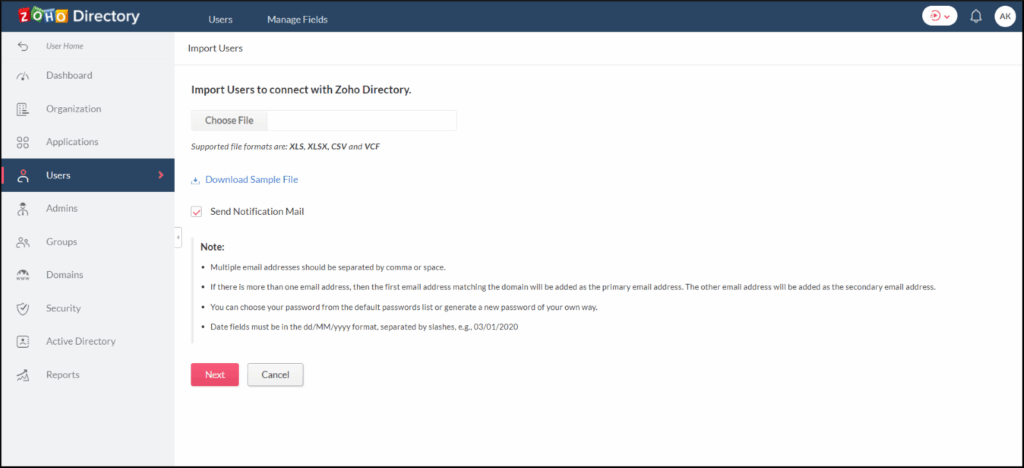
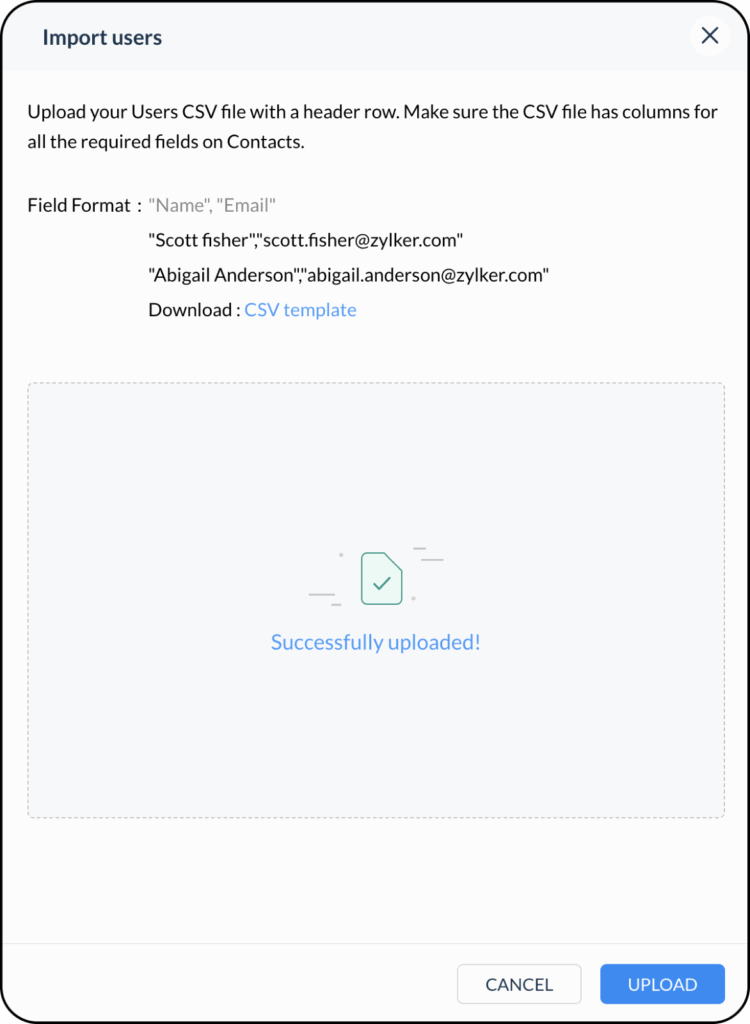
Upload Your File
- Choose your prepared file (XLS, CSV, XLSX, or VCF).
- Select the correct character encoding (e.g., UTF-8).
- Click Next to proceed.
Map Fields
- You will be prompted to map each column in your file to the corresponding Zoho One fields.
- Map additional email columns to the Email Address field using the ➕ icon.
- If your file doesn't include a password column, you can set up a common temporary password for all users—who will then be prompted to reset it upon first login.
Review Import Summary
- Zoho One will validate your data and display a summary.
- If any entries contain errors (e.g., missing email or password), a detailed list will be provided with reasons and suggestions.
Complete or Adjust
- Choose to:
- Resolve errors and re-import failed entries.
- Or skip problematic users and proceed with importing the rest.
Best Practices
- Use Zoho’s sample import template to ensure formatting consistency.
- Limit file size for faster processing - large imports may take a few minutes.
- Check license availability beforehand. If your organization doesn’t have enough user licenses, the import will be partially completed.
Final Notes
Always use a temporary password strategy if importing accounts in bulk and encourage users to set a secure personal password on first login. Consider enabling two-factor authentication (2FA) for added security.
Security Tip
Importing users via file upload streamlines user onboarding, especially for larger organizations or seasonal hiring. By following these structured steps, you ensure consistency, reduce manual work, and maintain data accuracy across your Zoho One directory.
If you need help preparing your import file or setting up custom fields, reach out to your system administrator or Zoho support.
